统一建模语言 Unified Modeling Language,UML
这里主要使用 UML 绘制类图
- Dependency 依赖、使用
- Association 关联
- Generalization 泛化、继承
- Realization 实现
- Aggregation 聚合(关联的一种)
- Composite 组合(关联的一种)
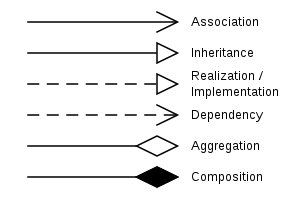
依赖
只要在类中用到了对方,那么就存在依赖关系,如:对于A依赖B
- B类是A类的成员属性
- B类是A类方法的返回类型
- B类是A类方法接收的参数类型
- B类在A类方法中使用到
泛化
是一种依赖关系的特例,泛化关系就是继承关系如:
对于B是A的泛化,指的就是B类继承A类
实现
是一种依赖关系的特例,如对接口的实现
关联
是一种依赖关系的特例,是类与类之间的联系,关联具有导航性,如双向或单向的关系,多重性
- 如B类是A类的成员属性,则称为单项关系,若A类同时是B类的成员属性,则称为双向关系
- 如B类是A类的一个成员属性,则是单一关联,也可以是多个B类都是A类的成员属性
聚合
是一种关联关系的特例,表示的是整体和部分的关系,整体与部分可以分开
- 如B、C类是A类的属性和方法,但B、C类可以和A类去除
public class Computer {
    private Mouse mouse;
    private Monitor monitor;

    public void setMouse(Mouse mouse) {
        this.mouse = mouse;
    }

    public void setMonitor(Monitor monitor) {
        this.monitor = monitor;
    }
}
组合
同聚合一样,但整体与部分不能分开
public class Computer {
    private Mouse mouse = new Mouse();
    private Monitor monitor = new Monitor();

    public void setMouse(Mouse mouse) {
        this.mouse = mouse;
    }

    public void setMonitor(Monitor monitor) {
        this.monitor = monitor;
    }
}
在本例中当 Computer 被实例化后,Mouse 和 Monitor 也同时被实例。
设计模式分类
设计模式共分为三种类型,共23种,不同资料分类和名称略有区别
- 创建型模式
单例、抽象工厂、原型、建造者、工厂 - 结构型模式
适配器、桥接、装饰、组合、外观、享元、代理 - 行为型模式
模板方法、命令、访问者、迭代器、观察者、中介者、备忘录、解释器、状态、策略、职责链
单例模式
采取一定的方法,保证在整个软件系统中,对某个类只能存在一个对象实例 ,并且对该类只提供一个取得对象实例的方法。
单例模式共有8种方式
- 饿汉式(静态常量)
- 饿汉式(静态代码块)
- 懒汉式(线程不安全)
- 懒汉式(线程安全,同步方法)
- 懒汉式(线程安全,同步代码块)
- 双重检查
- 静态内部类
- 枚举
饿汉式(静态常量)
方法
- 构造器私有化(防止使用new)
- 类的内部创建对象
- 向外暴漏一个静态的公共方法 getInstance
- 代码实现
public class Single1 {
    public static void main(String[] args) {
        Singleton instance = Singleton.getInstance();
        Singleton instance2 = Singleton.getInstance();
        System.out.println(instance == instance2); //true
    }

}

class Singleton {
    private Singleton() {

    }

    private final static Singleton instance = new Singleton();
    public static Singleton getInstance() {
        return instance;
    }
}
优缺点:
- 写法简单,类装载时完成实例化,避免了线程同步问题
- 如果没有使用这个实例,会造成资源浪费,没有达到 lazy loading 的效果
这种单例模式可用,但可能造成内存浪费
饿汉式(静态代码块)
方法
public class Single2 {
    public static void main(String[] args) {
        Singleton instance = Singleton.getInstance();
        Singleton instance2 = Singleton.getInstance();
        System.out.println(instance == instance2); //true
    }
}

class Singleton {
    private Singleton() {
    }

    private static Singleton instance;
    static {
        instance = new Singleton();
    }
    public static Singleton getInstance() {
        return instance;
    }
}
优缺点:
与上面的静态变量类似,优缺点相同
这种单例模式可用,但可能造成内存浪费
懒汉式(线程不安全)
方法
public class Single3 {
    public static void main(String[] args) {
        Singleton instance = Singleton.getInstance();
        Singleton instance2 = Singleton.getInstance();

        System.out.println(instance == instance2); //true
    }
}

class Singleton {
    private static Singleton instance;
    private Singleton() {}

    public static Singleton getInstance() {
        if (instance == null) {
            instance = new Singleton();
        }
        return instance;
    }
}
优缺点:
- 起到了Lazy loading的效果,但只能在单线程模式下使用
- 多线程下,一个线程进入了 if (Singleton == null) 语句块,还未执行时,另一个线程也通过了这个判断语句,这是会产生多个实例
实际开发时,不可用
懒汉式(线程安全,同步方法)
方法
将 public static Singleton getInstance() 替换为
public static synchronized Singleton getInstance()优缺点
- 解决了线程不安全的问题
- 效率低,每个线程在获得类的实例时,执行 getInstance 方法都要进行同步,
- 实际上,执行一次实例化就够了,再想获得直接return
实际开发时,不建议使用
懒汉式(同步代码块)
方法
同懒汉式(线程不安全),加入 if (Singleton == null) 判断后再同步
优缺点
- 本意是对四种实现方式改进
- 实际上不能起到线程同步的作用,可能会产生多个实例
线程不安全,不可用
双重检查
方法
public class Single6 {
    public static void main(String[] args) {
        Singleton instance = Singleton.getInstance();
        Singleton instance2 = Singleton.getInstance();

        System.out.println(instance == instance2); //true
    }
}

class Singleton {
    private static volatile Singleton instance;
    private Singleton() {}

    public static synchronized Singleton getInstance() {
        if (instance == null) {
            synchronized (Singleton.class) {
                if (instance == null) {
                    instance = new Singleton();
                }
            }
        }
        return instance;
    }
}
优缺点
- 两次检查,线程安全
- 实例化代码一次,再访问时,判断(singleton == null) 直接 return 对象
- 线程安全,延迟加载,效率较高
推荐使用
静态内部类
方法
注:类加载时,静态内部类不被加载;调用时静态内部类会被加载
public class Single7 {
    public static void main(String[] args) {
        Singleton instance = Singleton.getInstance();
        Singleton instance2 = Singleton.getInstance();

        System.out.println(instance == instance2); //true
    }
}

class Singleton {
    private static volatile Singleton instance;
    private Singleton() {}

    private static class SingletonInstance {
        private static final Singleton INSTANCE = new Singleton();
    }
    public static synchronized Singleton getInstance() {
        return SingletonInstance.INSTANCE;
    }
}
优缺点
- 使用类装载机制,保证实例化时只有一个线程
- 调用 getInstance 时再装载 SingletonInstance 类,完成实例化,实现延迟加载,效率高
- 类的静态属性,只能再第一次加载类的时候初始化,JVM保证了线程安全性
推荐使用
枚举
方法
public class Single8 {
    public static void main(String[] args) {
        Singleton instance = Singleton.INSTANCE;
        Singleton instance2 = Singleton.INSTANCE;

        System.out.println(instance == instance2); //true

        instance.sayOK();
    }
}

enum Singleton {
    INSTANCE;
    public void sayOK() {
        System.out.println("ok");
    }
}
优缺点
- 借助枚举类实现单例模式,避免多线程同步问题
- 还能防止反序列化重新创建新的对象
- Josh Bloch 提倡使用的方式
推荐使用
分析
JDK中的Runtime
public class Runtime {
    private static final Runtime currentRuntime = new Runtime();

    private static Version version;

    /**
     * Returns the runtime object associated with the current Java application.
     * Most of the methods of class {@code Runtime} are instance
     * methods and must be invoked with respect to the current runtime object.
     *
     * @return  the {@code Runtime} object associated with the current
     *          Java application.
     */
    public static Runtime getRuntime() {
        return currentRuntime;
    }

    /** Don't let anyone else instantiate this class */
    private Runtime() {}

    /**
     * Terminates the currently running Java virtual machine by initiating its
     * shutdown sequence.  This method never returns normally.  The argument
     * serves as a status code; by convention, a nonzero status code indicates
     * abnormal termination.
     *
     * <p> All registered {@linkplain #addShutdownHook shutdown hooks}, if any,
     * are started in some unspecified order and allowed to run concurrently
     * until they finish.  Once this is done the virtual machine
     * {@linkplain #halt halts}.
     *
     * <p> If this method is invoked after all shutdown hooks have already
     * been run and the status is nonzero then this method halts the
     * virtual machine with the given status code. Otherwise, this method
     * blocks indefinitely.
     *
     * <p> The {@link System#exit(int) System.exit} method is the
     * conventional and convenient means of invoking this method.
     *
     * @param  status
     *         Termination status.  By convention, a nonzero status code
     *         indicates abnormal termination.
     *
     * @throws SecurityException
     *         If a security manager is present and its
     *         {@link SecurityManager#checkExit checkExit} method does not permit
     *         exiting with the specified status
     *
     * @see java.lang.SecurityException
     * @see java.lang.SecurityManager#checkExit(int)
     * @see #addShutdownHook
     * @see #removeShutdownHook
     * @see #halt(int)
     */
    public void exit(int status) {
        @SuppressWarnings("removal")
        SecurityManager security = System.getSecurityManager();
        if (security != null) {
            security.checkExit(status);
        }
        Shutdown.exit(status);
    }
这是一个懒汉式,线程安全的写法。
注意事项
- 保证类只存在一个对象,节省系统资源,对于一些需要频繁销毁的对象,单例模式可以提高系统性能
- 如果实例化单例类时,由于构造器私有,要使用对应的方法,不能使用new
使用场景
- 频繁进行创建、销毁的对象
- 创建时耗费资源多(重量级对象),但又经常用到的对象
- 工具类对象
- 频繁访问的数据库或文件的对象
可以使用的方法
- 饿汉式(静态常量)
- 饿汉式(静态代码块)
- 双重检查
- 静态内部类
- 枚举
工厂模式
简单工厂模式
需求
对于一个披萨项目:要便于披萨种类的扩展,便于维护
- 披萨的种类很多
- 披萨的制作流程固定有:prepare\bake\cut\box
- 完成披萨店订购功能
原始思路:
- 创建一个抽象类,抽象类中含有上述 4 个方法
- 对于其它披萨,继承抽象类,并实现自己的方法
- 创建一个/多个order类调用各类披萨
- 创建一个/多个store类使用对应的order类
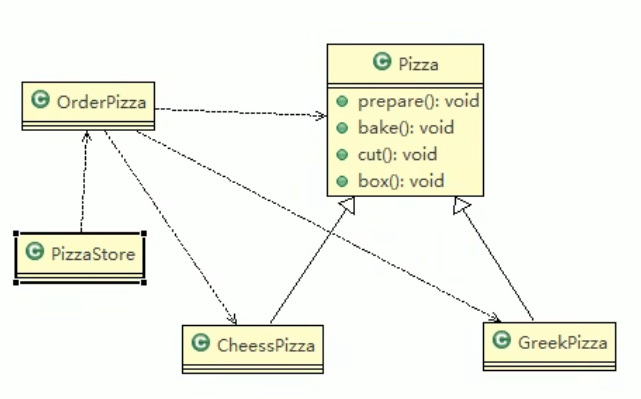
总结:
- 比较好理解,简单
- 违反了OCP原则,即对扩展开放,对修改关闭
以加入新增一个pizza的类为例:
- 新增一个类继承pizza
- 需要修改每一个order类,加入功能
分析和改进思路:
- 修改代码可以接受,但有多个order类用到创建新pizza的代码,每个order类都需要修改
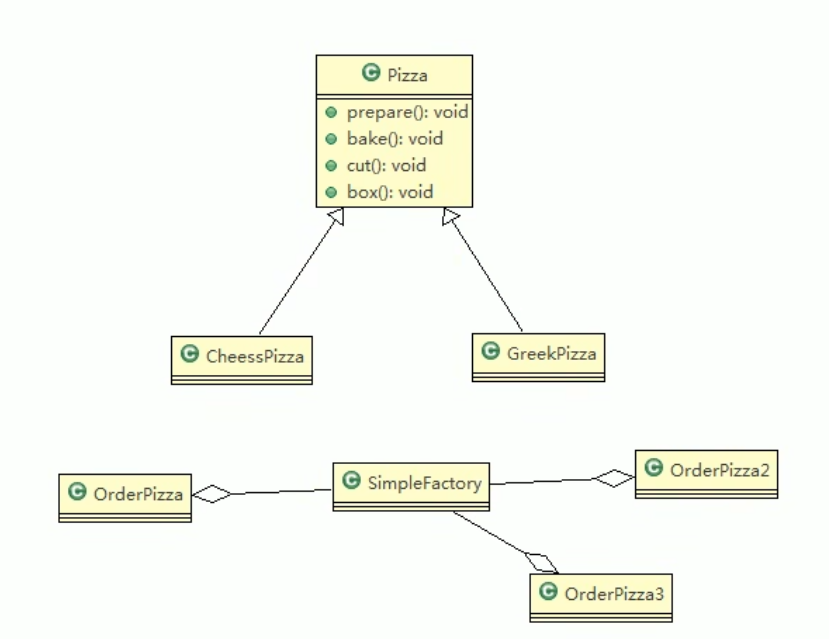
- 把创建Pizza对象封装到一个类中,这样只需要修改该类即可
基本介绍
- 简单工厂模式属于创建型模式,是工厂模式的一种
- 由一个工厂对象,决定创建哪一种产品的实例
- 定义了一个创建对象的类,这个类封装实例化对象的代码
- 当用到大量的创建某种、某类或者某批对象时,就会用到工厂模式
工厂方法模式
需求
客户在点披萨时,可以点不同口味的披萨,也可点不同地域风味的披萨,如:北京的奶酪pizza,伦敦的胡椒pizza
- 使用简单工厂模式,创建不同的简单工厂类,如 BJPizzaSimpleFactory 和 LDPizzaSimpleFactory 等
- 使用工厂模式
简单工厂模式对于当前这个案例来说是可行的,但考虑项目的规模时,可维护性、扩展性不是很好
基本介绍
工厂设计模式方案:将披萨项目由实例化功能抽象成抽象方法,在不同地域风味点餐子类中具体实现
定义一个创建对象的抽象方法,由子类决定要实例化的类,工厂方法将对象的实例化推迟到子类中
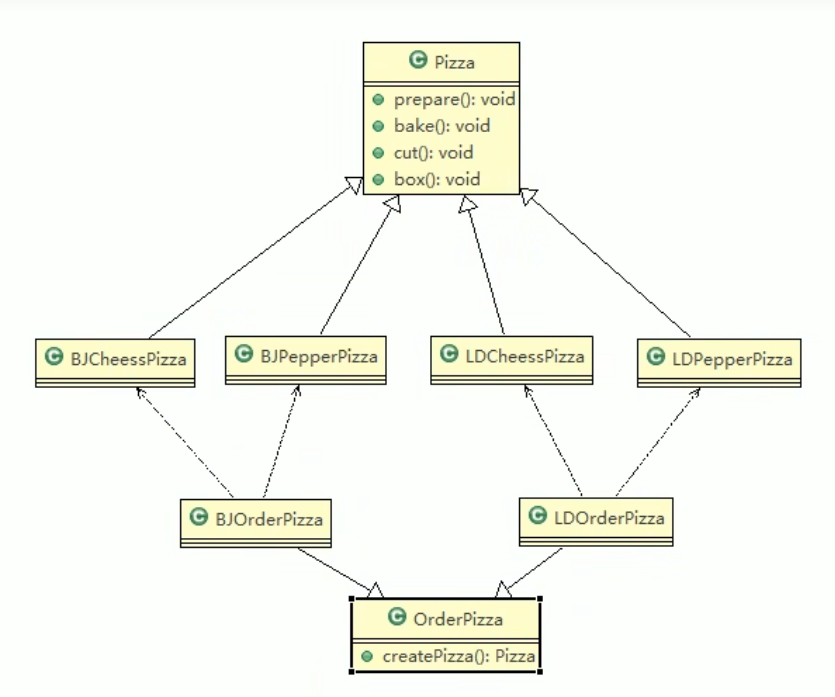
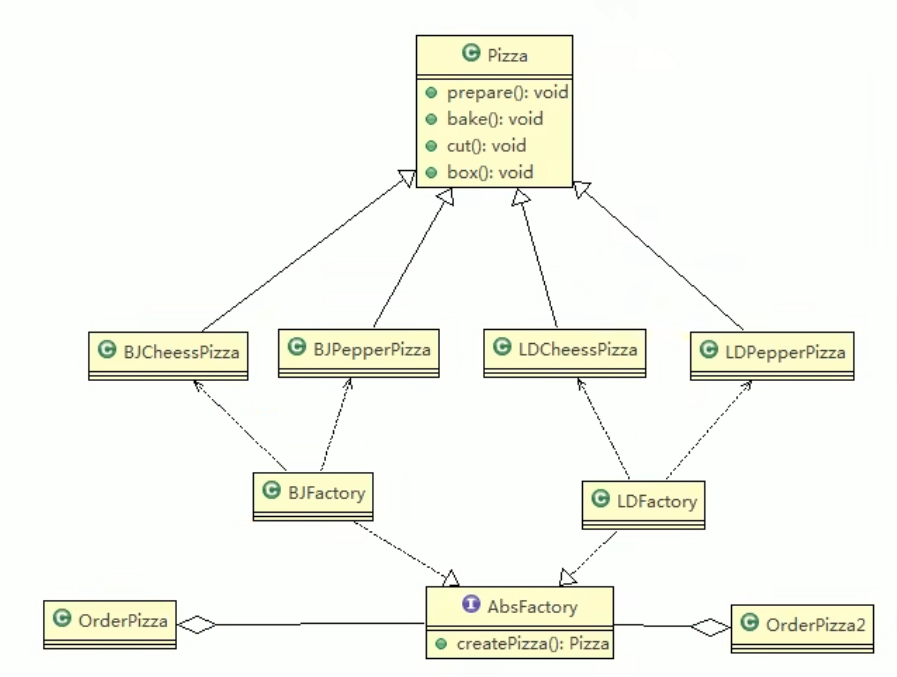
抽象工厂模式
方法
- 创建了一个接口,用于创建相关或有依赖关系的对象簇,而无需指名具体的类
- 抽象工厂模式可以将简单工厂模式和工厂方法模式进行整合
- 抽象工厂模式时对简单工厂模式的改进
- 将工厂抽象成了两层,AbsFactory(抽象工厂)和具体实现工厂子类
分析
JDK中的Calender
private static Calendar createCalendar(TimeZone zone,
                                           Locale aLocale)
    {
        CalendarProvider provider =
            LocaleProviderAdapter.getAdapter(CalendarProvider.class, aLocale)
                                 .getCalendarProvider();
        if (provider != null) {
            try {
                return provider.getInstance(zone, aLocale);
            } catch (IllegalArgumentException iae) {
                // fall back to the default instantiation
            }
        }

        Calendar cal = null;

        if (aLocale.hasExtensions()) {
            String caltype = aLocale.getUnicodeLocaleType("ca");
            if (caltype != null) {
                cal = switch (caltype) {
                    case "buddhist" -> new BuddhistCalendar(zone, aLocale);
                    case "japanese" -> new JapaneseImperialCalendar(zone, aLocale);
                    case "gregory"  -> new GregorianCalendar(zone, aLocale);
                    default         -> null;
                };
            }
        }
        if (cal == null) {
            // If no known calendar type is explicitly specified,
            // perform the traditional way to create a Calendar:
            // create a BuddhistCalendar for th_TH locale,
            // a JapaneseImperialCalendar for ja_JP_JP locale, or
            // a GregorianCalendar for any other locales.
            // NOTE: The language, country and variant strings are interned.
            if (aLocale.getLanguage() == "th" && aLocale.getCountry() == "TH") {
                cal = new BuddhistCalendar(zone, aLocale);
            } else if (aLocale.getVariant() == "JP" && aLocale.getLanguage() == "ja"
                       && aLocale.getCountry() == "JP") {
                cal = new JapaneseImperialCalendar(zone, aLocale);
            } else {
                cal = new GregorianCalendar(zone, aLocale);
            }
        }
        return cal;
    }
使用了一个简单工厂模式,根据不同的输入(地域、日历类型)返回不同的日历
意义
- 将实例化的代码提取出来,放到一个类中同一进行维护,和主项目的依赖关系解耦,提高扩展、维护性
- 共有三种工厂模式
- 遵循设计模式的依赖抽象原则
依赖抽象原则
- 创建对象时,不要直接使用new,而把new放在工厂的方法中,并返回 。
- 不要让类继承具体类,而是继承抽象类或者实现接口
- 不要覆盖基类中已经实现了的方法
原型模式
克隆羊
需求
现在有一只羊Tom
- 姓名:Tom
- 年龄:1
- 颜色:白色
现在创建和tom属性完全相同的10只羊
原始思路:
定义一个 Sheep 类:
public class Sheep {
    private String name;
    private int age;
    private String color;

    public Sheep(String name, int age, String color) {
        this.name = name;
        this.age = age;
        this.color = color;
    }
    // Getter and Setter
    //......
    @Override
    public String toString() {
        return "Sheep{" +
                "name='" + name + '\'' +
                ", age=" + age +
                ", color='" + color + '\'' +
                '}';
    }
}
使用时:
public class Client {
    public static void main(String[] args) {
        Sheep sheep = new Sheep("tom",1,"白色");
        Sheep sheep2 = new Sheep(sheep.getName(), sheep.getAge(), sheep.getColor());
        // ......
        System.out.println(sheep);
        System.out.println(sheep2);
        // ......
    }
}
分析和改进
- 好理解,简单
- 创建新对象时,总是需要获取原始对象的属性,创建对象比较复杂时,效率低
- 总是需要重新初始化对象
注:Java 中 Object 类是所有类的根类,Object 类提供了一个 clone 方法,该方法可以将 Java 对象复制一份,但需要实现 clone 的 Java 类需要先实现接口 Cloneable,表示该类能够复制,且具有复制的能力。
基本介绍
- 原型模式(Prototype)是指使用原型实例指定创建对象的种类,并且通过拷贝这些原型,创建新的对象
- 原型设计模式是一种创建型设计模式,允许一个对象再创建另外一个可定制的对象,无需知道如何创建的细节
- 工作原理是通过将一个原型对象传给要发动创建的对象,这个要发动创建的对象通过请求原型对象拷贝他们自己来实现创建
在 Sheep 类中实现 Cloneable 接口
    protected Object clone() {
        Sheep sheep = null;
        try {
            sheep = (Sheep) super.clone();
        } catch (Exception e) {
            System.out.println(e.getMessage());
        }
        return sheep;
    }
使用时
public class Client {
    public static void main(String[] args) {
        System.out.println("Proto Type Clone");
        Sheep sheep = new Sheep("tom",1,"white");
        Sheep sheep1 = (Sheep) sheep.clone();
        Sheep sheep2 = (Sheep) sheep.clone();
        Sheep sheep3 = (Sheep) sheep.clone();
        Sheep sheep4 = (Sheep) sheep.clone();
        Sheep sheep5 = (Sheep) sheep.clone();

        System.out.println("sheep1 ="+sheep1);
        System.out.println("sheep2 ="+sheep2);
        System.out.println("sheep3 ="+sheep3);
        System.out.println("sheep4 ="+sheep4);
        System.out.println("sheep5 ="+sheep5);
    }
}
当羊类需要添加默认属性时,如地域属性,只需要再 Sheep 类中添加对应的属性和默认值
浅拷贝和深拷贝
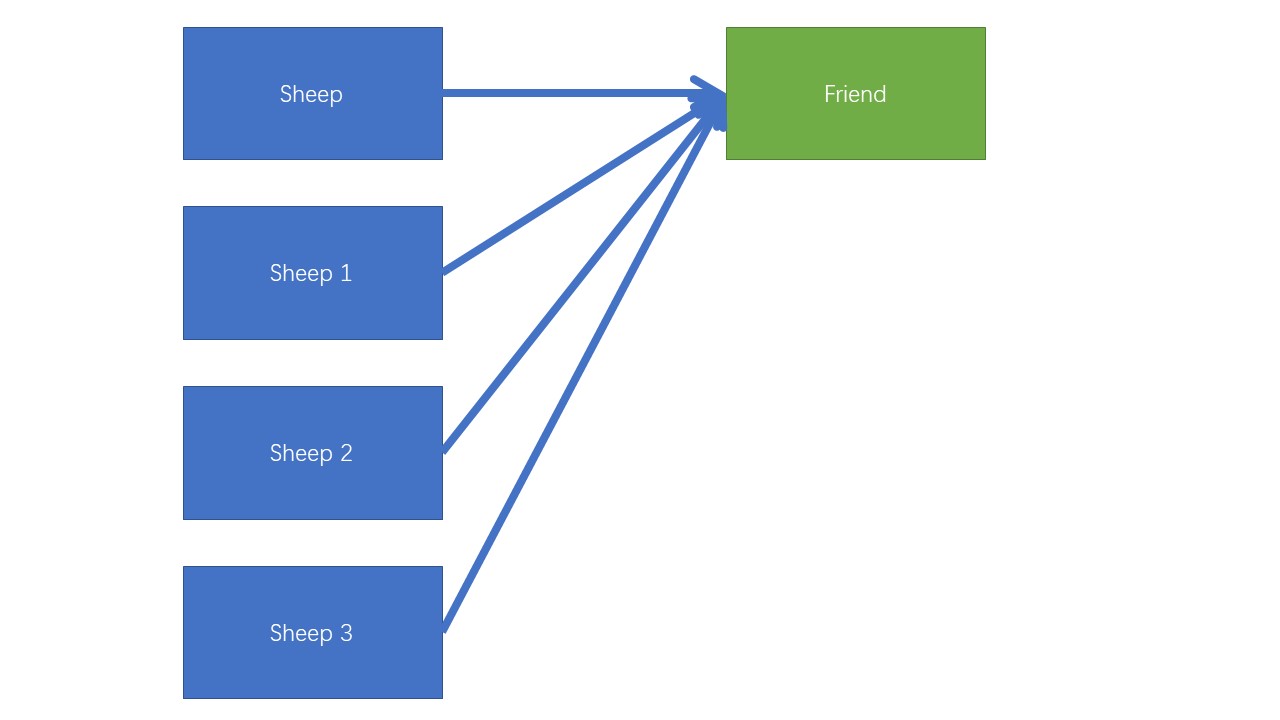
在上述问题中,如果 Sheep 类中,包含一个对象,在克隆时,只是将一个引用指向这个对象,这是一个浅拷贝。
省略 Get、Set 和 toString 方法的 Sheep 类:
public class Sheep implements Cloneable {
    private String name;
    private int age;
    private String color;
    public Sheep friend;

    public Sheep(String name, int age, String color) {
        this.name = name;
        this.age = age;
        this.color = color;
    }
}
使用时:
public class Client {
    public static void main(String[] args) {
        System.out.println("Proto Type Clone");
        Sheep sheep = new Sheep("tom",1,"White");
        sheep.friend = new Sheep("jack",2,"black");
        Sheep sheep1 = (Sheep) sheep.clone();
        Sheep sheep2 = (Sheep) sheep.clone();
        Sheep sheep3 = (Sheep) sheep.clone();
        Sheep sheep4 = (Sheep) sheep.clone();
        Sheep sheep5 = (Sheep) sheep.clone();

        System.out.println("sheep1 ="+sheep1+"sheep2.friend = "+sheep2.hashCode());
        System.out.println("sheep2 ="+sheep2+"sheep2.friend = "+sheep2.hashCode());
        System.out.println("sheep3 ="+sheep3+"sheep2.friend = "+sheep2.hashCode());
        System.out.println("sheep4 ="+sheep4+"sheep2.friend = "+sheep2.hashCode());
        System.out.println("sheep5 ="+sheep5+"sheep2.friend = "+sheep2.hashCode());
    }
}
得到结果:
sheep1 =Sheep{name='tom', age=1, color='White'}sheep2.friend = 381259350
sheep2 =Sheep{name='tom', age=1, color='White'}sheep2.friend = 381259350
sheep3 =Sheep{name='tom', age=1, color='White'}sheep2.friend = 381259350
sheep4 =Sheep{name='tom', age=1, color='White'}sheep2.friend = 381259350
sheep5 =Sheep{name='tom', age=1, color='White'}sheep2.friend = 381259350
hashcode全部相同
浅拷贝:
- 对于数据类型是基本数据类型的成员变量,浅拷贝会直接进行值传递,也就是将该属性值复制一份给新对象
- 对于数据类型是引用数据类型的成员变量,比如成员变量是某个数组、某个类的对象等,那么浅拷贝会进行引用传递,也就是只是将该成员变量的引用值(内存地址)复制一份给新的对象,实际上原来的对象和克隆出的对象都指向同一个实例
深拷贝:
- 复制对象的所有基本数据类型的成员变量值
- 为所有引用数据类型的成员变量申请内存空间,并复制每个引用数据类型成员变量所引用的对象,知道该对象可达的所有对象,也就是说,随想深拷贝要对整个对象进行拷贝

深拷贝的实现方法:
- 重写clone方法来实现
- 对象序列化来实现
有一个类DeepCloneAble实现了 Serializable 和 Cloneable 接口
import java.io.Serializable;
import java.util.Objects;

public class DeepCloneAble implements Serializable, Cloneable {
    public static final long serialVersionUID = 1L;
    private String cloneName;
    private String cloneClass;

    public DeepCloneAble(String cloneName, String cloneClass) {
        this.cloneName = cloneName;
        this.cloneClass = cloneClass;
    }
    protected Object clone() throws CloneNotSupportedException {
        return super.clone();
    }
}
使用两种不同的方式clone
import java.io.*;
import java.util.Objects;

public class DeepProtoType implements Serializable, Cloneable{
    public String name;
    public DeepCloneAble deepCloneAble;

    public DeepProtoType() {
    }

    //type1 override clone
    @Override
    protected Object clone() throws CloneNotSupportedException {
        Object deep = null;
        deep = super.clone();
        DeepProtoType deepProtoType = (DeepProtoType) deep;
        deepProtoType.deepCloneAble = (DeepCloneAble) deepCloneAble.clone();
        return deep;
    }

    //type2 Serialize
    public Object deepClone() {
        ByteArrayOutputStream bos = null;
        ObjectOutput oos = null;
        ByteArrayInputStream bis = null;
        ObjectInputStream ois = null;

        try{
            bos = new ByteArrayOutputStream();
            oos = new ObjectOutputStream(bos);
            oos.writeObject(this);

            bis = new ByteArrayInputStream(bos.toByteArray());
            ois = new ObjectInputStream(bis);
            DeepProtoType copyObj = (DeepProtoType) ois.readObject();
            return copyObj;
        } catch (Exception e) {
            e.printStackTrace();
            return null;
        } finally {
            try {
                bos.close();
                oos.close();
                bis.close();
                ois.close();
            } catch (Exception e2) {
                System.out.println(e2.getMessage());
            }
        }
    }
}
测试
public class Client {
    public static void main(String[] args) throws Exception {
        DeepProtoType p = new DeepProtoType();
        p.name = "a";
        p.deepCloneAble = new DeepCloneAble("b", "bcalss");

        DeepProtoType p2 = (DeepProtoType) p.clone();
        System.out.println("p1.name= " + p.name + "p1,deepCloneAble.hashcode=" + p.deepCloneAble.hashCode());
        System.out.println("p2.name= " + p2.name + "p2,deepCloneAble.hashcode=" + p2.deepCloneAble.hashCode());

        DeepProtoType p20 = (DeepProtoType)p.deepClone();
        System.out.println("p20.name= " + p2.name + "p20,deepCloneAble.hashcode=" + p20.deepCloneAble.hashCode());
    }
}
建造者模式
需求
盖房子,步骤为:
- 地基
- 砌墙
- 盖房顶
有三种不同房子:普通、别墅、大厦,按照原始的思路设计:
建立一个抽象类,包含三个步骤
public abstract class AbstractHouse {
    public abstract void buildBasic();
    public abstract void buildWalls();
    public abstract void roofed();

    public void build() {
        buildBasic();
        buildWalls();
        roofed();
    }
}
以普通房子为例,继承这个抽象类
public abstract class AbstractHouse {
    public abstract void buildBasic();
    public abstract void buildWalls();
    public abstract void roofed();

    public void build() {
        buildBasic();
        buildWalls();
        roofed();
    }
}
使用
public class client {
    public static void main(String[] args) {
        CommonHouse commonHouse = new CommonHouse();
        commonHouse.build();
    }
}
分析和改进:
- 简单,易操作
- 没有缓存层对象,扩展和维护性不好,把产品(房子)和创建产品的过程(盖房子)封装在了一起,耦合性强
基本介绍
- 建造者模式是一种对象构建模式,可以将负载的建造过程抽象出来(抽象类别),使这个抽象过程的不同实现方法可以构造出不同属性的对象
- 一步一步创建一个复杂的对象,它允许用户只通过指定复杂对象的类别和内容就可以构建他们,不需要知道内部的具体构建细节
四个核心角色:
- Porduct 产品角色:一个具体的产品对象
- Builder 抽象建造者:创建一个Product对象的纷纷部件指定的接口/抽象类
- ConcreateBuilder 具体建造者:实现接口,构建和装配各个部件
- Director 指挥者:构建一个使用Builder接口的对象,主要用于创建一个复杂的对象,隔离客户与对象的生产过程、负责控制产品对象的生产过程
Product
public class House {
    private String base;
    private String wall;
    private String roofed;

    public String getBase() {
        return base;
    }

    public void setBase(String base) {
        this.base = base;
    }

    public String getWall() {
        return wall;
    }

    public void setWall(String wall) {
        this.wall = wall;
    }

    public String getRoofed() {
        return roofed;
    }

    public void setRoofed(String roofed) {
        this.roofed = roofed;
    }
}
Builder
public abstract class HouseBuilder {
    protected House house = new House();
    public abstract void buildBasic();
    public abstract void buildWall();
    public abstract void roofed();

    public House buildHouse(){
        return house;
    }
}
Director
public class HouseDirector {
    HouseBuilder houseBuilder = null;

    public HouseDirector(HouseBuilder houseBuilder) {
        this.houseBuilder = houseBuilder;
    }

    public void setHouseBuilder(HouseBuilder houseBuilder) {
        this.houseBuilder = houseBuilder;
    }

    public House construct() {
        houseBuilder.buildBasic();
        houseBuilder.buildWall();
        houseBuilder.roofed();
        return houseBuilder.buildHouse();
    }
}
本例中 ConcreateBuilder 有两个分别实现 common 和 high
public class CommonBuilding extends HouseBuilder{
    @Override
    public void buildBasic() {
        System.out.println("common basic");
    }

    @Override
    public void buildWall() {
        System.out.println("common wall");
    }

    @Override
    public void roofed() {
        System.out.println("common roofed");
    }
}
public class HighBuilding extends HouseBuilder{
@Override
public void buildBasic() {
System.out.println("high basic");
}
@Override
public void buildWall() {
System.out.println("high wall");
}
@Override
public void roofed() {
System.out.println("high roofed");
}
}使用
public class Client {
    public static void main(String[] args) {
        HighBuilding highBuilding = new HighBuilding();
        HouseDirector houseDirector = new HouseDirector(highBuilding);
        houseDirector.construct();

        CommonBuilding commonBuilding = new CommonBuilding();
        houseDirector.setHouseBuilder(commonBuilding);
        houseDirector.construct();
    }
}
适配器模式
概念
基本介绍
- 适配器模式(Adapter Pattern)将某个类的接口转换成客户端期望的另一个接口表示,主的目的是兼容性,让原本因接口不匹配不能一起工作的两个类可以协同工作。别名包装器(Wrapper)
- 适配器模式属于结构型模式
- 主要分为三类:类适配器模式、对象适配器模式、接口适配器模式
工作原理
- 适配器模式:将一个类的接口转换成另一种接口.让原本接口不兼容的类可以兼容
- 从用户的角度看不到被适配者,是解耦的
- 用户调用适配器转化出来的目标接口方法,适配器再调用被适配者的相关接口方法
- 用户收到反馈结果,感觉只是和目标接口交互
类适配器
以手机充电器为例:
- 有一个类提供了一个 output 方法,返回一个 src 值为 220
- 一个手机类,需要 5V 电压,得到 5V 电压时打印 success
- 一个 5V 接口
- 一个 Adapter 得到 output 并实现接口,且满足手机的需要

Vlotage220V
public class Voltage220V {
    public int output220V() {
        int src = 220;
        System.out.println("V=" + src);
        return src;
    }
}
Interface Voltage5V
public interface Voltage5V {
    public int output5V();
}
Phone
public class Phone {
    public void charging (Voltage5V voltage5V) {
        if (voltage5V.output5V() == 5) {
            System.out.println("success");
        } else {
            System.out.println("failed");
        }
    }
}
Adapter
public class VoltageAdapter extends Voltage220V implements Voltage5V{
    @Override
    public int output5V() {
        int src = output220V();
        int dstV = src/44;
        return dstV;
    }
}
使用
public class Client {
    public static void main(String[] args) {
        Phone phone = new Phone();
        phone.charging(new VoltageAdapter());
    }
}
得到输出 success
通过 Adapter, Phone得到了5V电压,且不知道使用了220V的电压
- Java 是单继承机制,所以类适配器需要继承 src 类这一点算是一个缺点, 因为这要求 dst 必须是接口,有一定局限性
- src 类的方法在 Adapter 中都会暴露出来,也增加了使用的成本
- 由于其继承了 src 类,所以它可以根据需求重写 src 类的方法,使得 Adapter 的灵活性增强了
对象适配器
- 基本思路和类的适配器模式相同,只是将 Adapter 类作修改,不是继承 src 类,而是持有 src 类的实例,以解决兼容性的问题。 即:持有 src 类,实现 dst 类接口
- 根据“合成复用原则”,在系统中尽量使用关联关系(聚合)来替代继承关系
- 对象适配器模式是适配器模式常用的一种